I was dreading this month but it has turned out quite okay. The trip to the US was not boring but a rather eventful and now I am homeward bound for the holidays. Been away from the usual experimenting and blogging. Be back soon. Wish you all a very merry christmas and a happy new year.
Friday, December 21, 2012
Monday, November 12, 2012
Veg Manchurian and Manchurian Sauce
The day has started off well with a perfect Sindhi breakfast and a perfect Chinese combo for lunch. We had vegetable fried rice with vegetable manchurian plus mushroom manchurian in sauce. You can find the recipe for the fried rice here.
 We had eaten Chinese food the previous week at Shitake at Park Square Mall and were bitterly disappointed. Today, it feels like we ate "Chinese" food.
Ingredients :


Ingredients :

- Mixed vegetables like finely chopped carrots and french beans
- 1 cup maida
- 2 tbsp cornflour
- Salt to taste
- 1 tsp red chilli powder
- 1 tbsp ginger garlic paste
- 1 tsp black pepper powder
- Water - enough to make a thick dosa batter
- Oil for deep frying
How I made it :
- Mix together all ingredients from 1 to 7.
- Add water little by little till it resembles a thick pakoda batter.
- Heat oil and fry tiny balls of this mixture.
- Serve hot.
I had made the sauce below for the mushroom manchurian, which was reused for this.
Manchurian Sauce :
Ingredients :
- 1 tsp cornflour mixed in 1/2 cup cold water - do not use hot water
- 1 tbsp ginger garlic paste
- 1 tbsp oil
- 5 spring onions - chopped, green and white separately
- 2 finely chopped green chillies
- 2 tbsp soya sauce
- 1/4 cup Maggi Oriental Sauce - (optional)
- 1/4 cup tomato ketchup - use 1/2 cup if not using the oriental sauce
- 1/2 tsp black pepper powder
How I made it :
- Heat oil in a pan.
- Fry the ginger garlic paste.
- Add the white parts of the spring onion and fry for 3 minutes on low heat
- Add the green chillies and black pepper
- After a minute, add the soya sauce taking care to not let it burn.
- Add both the oriental as well as tomato ketchup.
- Once it starts bubbling, put in the water containing dissolved cornflour.
- Once the sauce starts to thicken, turn off heat
Here is a picture of the mushroom manchurian in the sauce.

Sunday, November 11, 2012
Sindhi Breakfast - Koki - my favorite
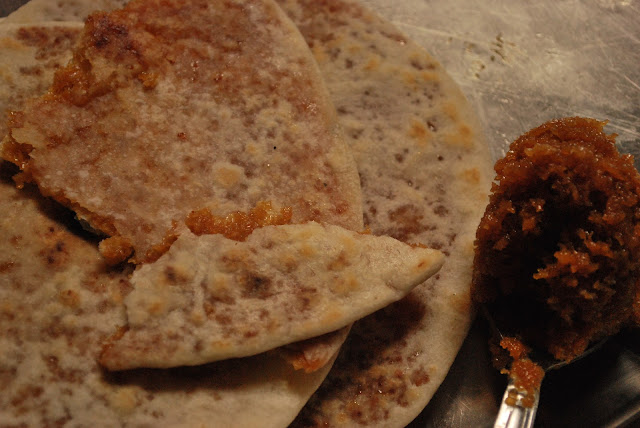
Koki is a kind of mixed paratha. Onions, green chillies, chopped coriander, red chilli powder and salt are a must add to the flour while making the dough. Optionally, jeera/cumin or saunf could be added.
I love koki and think that it is a quickie breakfast. Kokis go well with tea, unsalted butter and sugar, pickle, curd and papad. My mom and aunt's kokis are famous amongst my friends and they, mostly men, have taken to cooking kokis when away from home. There must be something about them right?

Ingredients (makes 2 kokis):
- 1 cup whole wheat flour
- 1 medium sized onion chopped finely
- 3 tablespoons oil + extra for cooking
- 1/2 teaspoon red chilli powder
- 1 finely sliced green chilly
- finely chopped coriander
- salt to taste
- Water - enough to make the dough. I used the whey which is left after making homemade panneer this time
- In a wide bowl, mix in all ingredients from 1 to 7.
- Slowly add water to make a dough.
- Roll out into 1/2 cm thick parathas.
- Use a knife to draw a criss cross on one side - this helps it cook more evenly and also makes it look more interesting.
- On a hot tawa/flat pan, on high heat, place the paratha with the criss cross side on top.
- After 30 seconds, pour some oil on top and flip it. Reduce heat to low.
- Cook for about 2 minutes and flip it again making the heat high. Add more oil as desired.
- When dark brown spots appear, it is done. Serve hot or cold. These stay for about 24 hours in an airtight container and are perfect for travelling. Have it with a hot cup of chai.
No wonder I keep saying that people don't use their common sense! He's dead Jim!
I came across this as a comment on http://crabbyoldfart.wordpress.com/. It reflects how I feel exactly these days when
"An Obituary printed in the London Times…….. Interesting and sadly rather true
- I see people honking madly to get through traffic
- I see two wheeler riders trying to get through the four wheelers
- I see the piles of garbage dumped at every corner imaginable
- I see that people still argue about garbage segregation like it is not their responsibility, the garbage is not their responsibility
- I read news about couples suing the builders for not putting proper protective railing in balconies and windows
- Just too many to list out here... but you get the point!
"An Obituary printed in the London Times…….. Interesting and sadly rather true
Today we mourn the passing of a beloved old friend, Common Sense, who has been with us for many years. No one knows for sure how old he was, since his birth records were long ago lost in bureaucratic red tape. He will be remembered as having cultivated such valuable lessons as: Knowing when to come in out of the rain; Why the early bird gets the worm; Life isn’t always fair; and maybe it was my fault.
Common Sense lived by simple, sound financial policies (don’t spend more than you can earn) and reliable strategies (adults, not children, are in charge).
His health began to deteriorate rapidly when well-intentioned but overbearing regulations were set in place. Reports of a 6-year-old boy charged with sexual harassment for kissing a classmate; teens suspended from school for using mouthwash after lunch; and a teacher fired for reprimanding an unruly student, only worsened his condition.
Common Sense lost ground when parents attacked teachers for doing the job that they themselves had failed to do in disciplining their unruly children.
It declined even further when schools were required to get parental consent to administer sun lotion or an Aspirin to a student; but could not inform parents when a student became pregnant and wanted to have an abortion.
Common Sense lost the will to live as the churches became businesses; and criminals received better treatment than their victims.
Common Sense took a beating when you couldn’t defend yourself from a burglar in your own home and the burglar could sue you for assault.
Common Sense finally gave up the will to live, after a woman failed to realize that a steaming cup of coffee was hot. She spilled a little in her lap, and was promptly awarded a huge settlement.
Common Sense was preceded in death, by his parents, Truth and Trust, by his wife, Discretion, by his daughter, Responsibility, and by his son, Reason.
He is survived by his 4 stepbrothers;
I Know My Rights
I Want It Now
Someone Else Is To Blame
I’m A Victim
I Know My Rights
I Want It Now
Someone Else Is To Blame
I’m A Victim
Not many attended his funeral because so few realized he was gone. If you still remember him, pass this on. If not, join the majority and do nothing"
Please note that all thoughts on this blog are mine alone and may or may not change with the passage of time. None of my thoughts are targeted at any one person in particular.
Saturday, November 10, 2012
My first gel wax candle


Have got some tips from my teacher to avoid those bubbles.. until next time.
Wednesday, November 7, 2012
Panneer Stuffed Snake Gourd recipe
Well, I did not want to make the same usual stuff with the snake gourd that I'd got at hand and so decided to try and stuff it. I do remember seeing related recipes a very long time back but when I did google for "stuffed snake gourd" I was shocked to see that most of them were stuffed with meat or aloo. I decided to do it with panneer as I had in mind while returning from work.
I acted smart and made panneer burji. I made that in excess so that I could stuff the snake gourd with the same. It was scrumptuous.

Ingredients :

I acted smart and made panneer burji. I made that in excess so that I could stuff the snake gourd with the same. It was scrumptuous.

Ingredients :
- Medium snake gourd - peeled and deseeded
- Enough panneer burji to stuff in
- Salt to rub onto the snake gourd
- 2 tbsp oil
How I made it :
- Rub salt onto the snake gourd and cook on high in microwave for 5 minutes or until 3/4th cooked.
- Fill it with panner burji
- Heat oil in a wide pan.
- Shallow fry the stuffed snake gourd pieces
Serve hot with rotis. Best had hot. As it cools, you may not like the taste of the oil - remember that shallow frying causes food to actually absorb/retain more oil.

Saturday, November 3, 2012
Glazed Tofu with Stir fried BokChoy and Veggies
I had bought BokChoy recently and I had also picked up Tofu. Google showed me this very interesting recipe which I just had to try. I also added some more veggies to the stir fry and here's what it looked it.


Thengai Poli/Ubittu
Whilst in Chennai, our company used to sponsor snacks, which used to be my dinner, for those staying back beyond 7pm at work. This was a real motivation for many to stay back until 7pm. One of my favorites was poli. Warm and sweet, these melt in the mouth stuffed rotis were never something that I stayed away from. I saw this recipe on Nag's blog and it reminded me of poli. I had some coconut on hand and so decided to make the poli with the coconut stuffing rather than the dal. This would also make Pras very happy as he is a keralite who loves his coconuts (wicked smile ;))
When I gave Pras the first one, he went "It tastes just like it does in the store brought ones." Well, what more would I want to hear :)
Ingredients (makes 5 polis):
When I gave Pras the first one, he went "It tastes just like it does in the store brought ones." Well, what more would I want to hear :)

Ingredients (makes 5 polis):
- 1 cup of maida - you could use whole wheat if you like
- 1/2 cup jaggery
- 1/2 cup coconut grated
- 2 pods of green cardomom crushed
- Salt a pinch
- 1 tbsp oil
- 2 tbsp ghee
- Water - 1/4 cup + enough to make a smooth dough
How I made it :
- Add the pinch of salt to the flour and make a smooth dough. Ply the dough for about 2 minutes before letting it rest for about 1 hour.
- In the meantime, use as little water as possible to melt the jaggery in. This can be done on the stove top with regular mixing. Cutting the jaggery into smaller pieces help this get done sooner.
- Sieve this melted jaggery syrup to remove any impurities.
- Add the coconut to this and cook on the stove until the mixture becomes sticky and almost dry.
- To this add the crushed cardamom powder.
- Now rub some oil onto a plastic sheet.
- Take a ball of dough and flatten it out in your palm, making a well in the center.
- Fill this with the coconut jaggery mixture. Try to put as much as possible. Don't be scared of it coming out as this will be a sticky mixture and wont ooze out or cause too much trouble when rolling out.
- Pull the ends of the dough so as to enclose the coconut jaggery mixture and roll this into a thin stuffed roti. You could alternately make it like making stuffed aloo paratha.
- Cook on a hot tava until both sides brown. Apply ghee generously and take off the heat.
Nilam Special Uzhunnu Vada
Well, we all know how Sandy and Nilam struck at about the same time, except at different places. So it was one of those rainy holidays on which I had to sit at home. Pras was working and so we had no plans of going out. I woke up and soaked urad dal for making my favorite vada. It is the perfect accompaniment to tea on a cold rainy day or may be any day :)

Ingredients (For 10 vadas) :

Ingredients (For 10 vadas) :
- 1 cup skinless white urad dal soaked in water for about 4 hours
- 1 medium sized onion chopped
- 2 green chillies finely chopped
- chopped coriander leaves
- 1 tsp whole pepper corns
- Salt to taste
- Oil for frying
Equipment needed:
A grinder/food processor
How I made it :
- Grind the soaked urad dal with as little water as possible to make a thick smooth paste.
- To this ground batter add the chopped onions, coriander, green chillies, pepper corns and salt.
- Heat up some oil in a deep pan/wok/kadai.
- This step is all about frying but if you want to get the right shape of a vada, read on. Keep a bowl of water on the side. Dip the fingers of your right hand in the water. With the excess water wet the palm of your left hand. Now, using your right hand scoop out a sapota sized ball of batter. Flatten it out on your left palm. Now, dip your right index finger into the water and make a hole in the center of the flattened batter.Drop this into the hot oil. Fry until golden brown on both sides, about 3 minutes a side.
- Serve hot with a steaming cup of chai and coconut chutney
Tips :
- Use as little water when grinding. The more water you use, grinding may be easy but getting the right shape and texture for frying will be tough.
- If you have added a lot of water, you could add some rice flour to thicken the batter.
- You could add pieces of coconut to the batter.
- To test the oil, put in a small drop of the batter. If it rises immediately, the oil is hot. You don't want smoking hot oil either
- Serve with sambar for breakfast
Sunday, October 7, 2012
Vendakka Kara Kuzhambu/South Indian Ladies Finger/Okra curry - II
I have posted an earlier version of my south indian okra curry here. I was too lazy to refer my recipe and cook so today I tried a slightly different version based on the drumstick kara kuzhambu that I had tried last week. This has a more authentic taste with the sweetness of the fennel/saunf coming through. Do give it a try and let me know which one you prefer.

Ingredients (for 2 as a side dish) :
- 30 ladies finger pieces - cut into 1 inch pieces
- 1 medium onion finely chopped
- 1 medium tomato finely chopped
- 3 cloves of garlic
- 1/4 cup coconut
- 1 tsp fennel/saunf seeds
- 1/2 tsp methi/fenugreek seeds
- 5 dried red chillies - adjust as per spiciness desired
- 1 tbsp coriander powder
- Tamarind ball the size of a small marble soaked in water
- 2 tbsp oil
- 1 tsp mustard seeds
- 1/2 tsp fennel/saunf seeds - apart from what is mentioned in 7.
- 1/2 tsp turmeric powder
- 1/2 tsp garam masala powder
- Salt to taste

How I made it :
- Grind ingredients 4 to 9 with enough water to make a smooth paste
- In 1 tsp oil, fry the ladies finger pieces till the edges start to brown. Let them retain their crunch.
- In a pan, heat the remaining oil.
- Put in the mustard and fennel seeds. Once they completely splutter, put in the onions.
- Fry till onions turn pink.
- Add the ground paste.
- Fry on low heat, mixing frequently to avoid sticking. Fry for about 8 minutes.
- Add in the tomatoes.
- At this point, I put this entire mixture into a pressure cooker, added about 1/4 cup of water and cooked until 5 whistles on low.
- To this, I added the tamarind water, turmeric powder, garam masala powder and salt to taste.
- Throw in the okra pieces.
- Add water to achieve desired consistency of gravy. Boil on low heat for about 10 minutes.
- Garnish with chopped coriander and serve with rice.
Thursday, October 4, 2012
Oats Muffins
I seem to be stocking up on a lot of things. One of the disadvantages of frequent visits to the supermarket - you do end up picking a lot of stuff that you don't really need, and I mean - A LOT. I had picked up this bag of oats for a quick weekday breakfast, just as I had many other such similar items. I got home last evening elated that I need not cook as I had lots of food leftover from the previous day. With time on my hands, I decided to make these oats muffins which I got from here.
If you are a Sindhi and know what "kutti" is, you will love these. It reminded me so much of the days when mom would fast on Teej and bring this delectable treat home. "Kutti" is something like roasted wheat flour with sugar. The sugar is added when the flour is hot which causes it to just melt, creating magical flavours and texture.

Ingredients (For 6 muffins) :
For Streusel :
For Muffins :
How I made it :
Prep for stresel:
Muffins:

If you are a Sindhi and know what "kutti" is, you will love these. It reminded me so much of the days when mom would fast on Teej and bring this delectable treat home. "Kutti" is something like roasted wheat flour with sugar. The sugar is added when the flour is hot which causes it to just melt, creating magical flavours and texture.

Ingredients (For 6 muffins) :
For Streusel :
- 1/8 cup all purpose flour
- 1/6 cup oats
- 1/8 cup brown sugar
- 1 tablespoon unsalted butter
For Muffins :
- 1/2 cup milk
- 1/8 cup oil
- 1 beaten egg
- 1/2 tsp vanilla essence/powder
- 3/4 cup whole wheat flour
- 1/6 cup brown sugar
- 1/2 cup oats
- 1/2 tablespoon baking powder
How I made it :
Prep for stresel:
- Mix together the oats, sugar and wheat flour.
- Cut in the butter. Mix with a fork to form a crumby mixture. Keep aside.
Muffins:
- Preheat oven to 200 degree C
- Mix together the baking powder, wheat flour, oats and sugar. If using vanilla powder, add that now. If using vanilla essence hold off with that in this step.
- Mix together milk, oil and egg. If using vanilla essence, add that in.
- Mix the wet and dry. Pour into muffin moulds.
- Sprinkle streusel on the top. Press it in lightly.
- Bake for 20 minutes.
The top has a light crunch which rates this quite high on my list of dishes to make again and again. Tastes best when had warm on the same day. It loses its crunch the next day.

Wednesday, October 3, 2012
Spicy Panneer Bhurji
I love Panneer, esp. home made crumbled panneer - just fresh off the heat. It has been ages since I made panneer and especially this recipe. So here goes..
Ingredients (serves 2):
For the panneer
Milk - 1 litre
Vinegar - 1 capful
Curd - 1 tablespoon
For the Bhurji

How I made it :-
For the panneer
In a pan, bring the milk to a boil. Add the curd and vinegar. The milk will curdle. Strain out the liquid and retain it. It can be used for making extra soft rotis or for naans. Make sure to drain out as much liquid as you can from the panneer - I use a cloth and tie the panneer in that while I proceed with the rest.
For the bhurji
Ingredients (serves 2):
For the panneer
Milk - 1 litre
Vinegar - 1 capful
Curd - 1 tablespoon
For the Bhurji
- Panneer - made from above
- 1 onion - finely choppped
- 1/2 capsicum - finely chopped - I used a large one. Use a full capsicum if the size is small. (optional)
- 1/2 cup shelled peas
- 1 cup tomato puree
- 1 tbsp ginger and garlic paste
- 1 tsp red chilli powder
- 1/2 tsp garam masala powder
- A pinch of kasuri methi
- 1 tsp cumin/jeera seeds
- A pinch of tumeric powder
- salt to taste

How I made it :-
For the panneer
In a pan, bring the milk to a boil. Add the curd and vinegar. The milk will curdle. Strain out the liquid and retain it. It can be used for making extra soft rotis or for naans. Make sure to drain out as much liquid as you can from the panneer - I use a cloth and tie the panneer in that while I proceed with the rest.
For the bhurji
- In a wok heat up oil. Throw in the jeera seeds and kasuri methi.
- Once fragrant, add the onions and capsicum.
- Once the onion is pink, add the ginger garlic paste and peas.
- Fry for a minute.
- Add the tomato puree and powders.
- Fry till fat separates.
- Add the panneer and salt.
- Garnish with coriander leaves and serve hot with rotis.
Sunday, September 30, 2012
Review of Benjarong, Bengaluru
On my way to Fame Lido mall, I had seen this huge ad for the Fish Festival that's on at Benjarong. I just let it slip my mind cause I knew it would be one of those fancy and pricey places. However, they did advertise in the newspaper when it caught hubby's eyes and now, which mallu does not love his fish? He immediately made plans for our weekend. I did not want to spoil his excitement.
So all set, the Sunday was planned. 11am to the Frazer Times Fair and following that to Benjarong. We were unable to make a reservation as their landline number was "switched off". The Frazer Times Fair was an absolute treat and left a big gaping hole in my pocket. It showcased all women entrepreneurs with their ever loving faithful husbands around them for support and to look after the little ones. It was so cute. I was truly touched.
Fortunately or unfortunately, we did get a table for two at Benjarong. The ladies looked pretty and graceful in skirts similar to that in the Kira, the national dress of Bhutan. The waiters were very well educated and groomed. We were served a complimentary starter - a traditional thai dish Mian Khum. It is a traditional leaf wrapped salad. We were served lettuce leaves with it and it was an absolute treat with palm sugar jaggery syrup, roasted peanuts, fresh ginger and lime, amongst other ingredients.
We then had a longish wait for our actual starter - the seafood platter. This costs 1.5k including crab, prawns, mussels. It was not that great. The menu does indicate that it is spicy but it was not one bit spicy. I guess we need to indicate the level of spice desired. In fact, just as we walked in there was a very kind gentleman who indicated to us that we'd need to indicate that we'd not like the food too spicy. Since we wanted the food spicy, we did not suggest any changes.
Next was our main which was thai fried rice with prawns curry. When the dish came in, it looked spectacular - the rice was wrapped in a thin omelette. Unfortunately, looks did not live up to the taste. It tasted bland contrary to what was stated on the menu.
Then we had dessert which was water chestnut in chilled coconut milk. Well, this was an absolute delight. A light dessert after so much eating.
Overall, it was an average experience but very expensive.
My tips:
- Avoid the terrace seats - your food welcomes the flies.
- It costs about 4k for 2 persons for a 3 course meal + complimentary starter, including a drink each. The portions are modest.
- Visit the place in the night as I think you could get a romantic candlelight dinner.
Monday, September 24, 2012
Beetroot cake
I had this one odd beetroot lying around in my vegetable basket and I really did not know how to use it up. I usually make a beetroot paratha which hubby hates - I've not figured that out till date.
I browsed around a bit as I did remember seeing quite a few beetroot cake recipes when I made the eggless beetroot chocolate cake sometime back. Here is Nigel Slater's version of the beetroot cake.
Fortunately, this cake was ready just in time for guests. They loved it.

Ingredients :

I browsed around a bit as I did remember seeing quite a few beetroot cake recipes when I made the eggless beetroot chocolate cake sometime back. Here is Nigel Slater's version of the beetroot cake.
Fortunately, this cake was ready just in time for guests. They loved it.

Ingredients :
- 1 cup whole wheat atta + enough for dusting
- 1 cup brown sugar
- 180ml oil + 1tsp for preparing the cake tin.
- 1/3 cup raisins
- 1/3 cup chopped walnuts
- 2/3 cup grated raw beetroot
- 3 eggs separated
- 1tsp baking powder
- 1/2 tsp baking soda
- 1 tsp ground cinnamon powder - I usually grate a stick then and there as needed

Other equipment required :
- Grater
- Mixer
- Hand blender or egg beater
- OTG or Microwave with Convection option
How I made it :
- Preheat the oven at 180 degree C.
- Prepare the cake tin by first rubbing a layer of oil followed by a dusting of flour. I used a square 20 cm tin. The original recipe called for the use of a rectangular loaf tin. However, there as no difference in cooking time.
- Sift the flour with baking powder and soda. This is to incorporate air into the flour.
- In a mixie jar, beat the oil and sugar together.
- Add the egg yolks one at a time, beating well in between additions.
- Mix in the beetroot, walnuts and raisins.
- Fold in the sifted flour mixture along with the cinnamon powder.
- In a separate bowl, with a hand mixer beat the egg whites till soft peaks form.
- Gently fold until well combined into the mixture at 7. Please ensure that it is well combined.
- Pour into cake tin.
- Bake at 180 degree C for 55 minutes. Cover with aluminium foil after 30 minutes.
It was truly delicious - moist and hearty. Healthy too.
Saturday, September 22, 2012
Egg Curry
We got this Aachi Egg Curry Powder free with a pack of 6 eggs. Since I had some coconut in the fridge, I thought that this curry would be the best way to use it up. Here is their recipe. I followed the recipe on the back of the packet. I served it with rice and keerai poriyal.

Ingredients (serves 4) :

Ingredients (serves 4) :
- 4 hard boiled eggs
- 3 medium sized onions, finely sliced
- 1/2 cup fresh coconut
- 1 packet of Aachi Egg Curry Powder
- 2 tbsp oil
- 2 cups of water
- Salt to taste
- Coriander to garnish
How I made it :
- Grind the coconut with 2 cups of water.
- Heat 2 tbsp oil.
- Add the sliced onions.
- Fry the onions till they turn dark golden brown.
- Add the coconut and water paste.
- Add the egg curry powder.
- Fry till the curry thickens - about 10-12 minutes
- Add salt.
- Put in the halved boiled eggs.
- Turn off heat. Garnish with coriander leaves.
This was truly delicious. My mom sometimes tells me to buy these readymade powders as they have the perfect mix of the coriander, cumin, red chilli and other spice powders. I usually dismiss her suggestion but I think that henceforth, I may be reaching out for these mixes once in a while.
Maggi Exotica
I make this quite often with whatever veggies I have at hand. This time I had these exotic vegetables that I picked up during my visit to Ooty. I had to use up the veggies soon, before they began to rot as my hubby too had bought veggies from the store nearby. Coincidentally, Nags has put up a similar recipe.You can check out Nag's version of Maggi here.

Ingredients (serves 2):

Ingredients (serves 2):
- 1 small sized red onion finely sliced
- 1 small sized broccoli split into florets
- 1/4 red cabbage chopped into fine strips
- 1 carrot chopped into fine strips
- 15 french beans chopped lengthwise
- 8 cloves garlic chopped into small pieces
- 1 inch ginger julienned - very fine thin strips
- 1/2 tsp soya sauce
- 1/2 tsp vinegar
- 2 packets maggi with taste maker
- 1/4 tsp salt + 1/2 tsp
- Water to cook maggi
- 2+2tbsp oil + 1 tbsp (optional)
How I made it :
- Heat up water to immerse noodles. Add 1/2 tsp salt and 2tbsp oil. Boil for 2 minutes. Drain. Rinse noodles in cold water. You can pour an additional tablespoon of oil on top to ensure that they don't stick to each other. I usually put olive oil on the top.
- In a wok, heat up 2tbsp oil.
- Put in the ginger and garlic.
- After 1 minute, put in the onions.
- When the onion starts turning pink, add the vegetables.
- When the veggies are more than half cooked, add the vinegar, soya sauce and taste maker.
- Add 1/4 tsp salt.
- Turn off heat when the veggies are cooked to your liking. I like some crunch in the vegetables.
- Mix in the noodles. Best done with two forks.
Thursday, September 20, 2012
Mom's butter panneer recipe with Methi Rotis
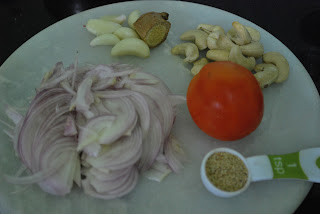
After all my cooking experiments, I wanted to make something the way my mom makes it. All this, only because, I really did not get to eat much of mom made food when I was at home this last time. Butter panneer used to be one of my favorites - absolutely yummy with rotis and sindhi papad. Without any further delay, here goes the recipe
Ingredients (serves 2) :
How I made it :
1. Soak the khus khus and cashew in a small quantity of water, enough to at least cover the khus khus and cashew. Heat up the water - a minute in the microwave. Watch the time as the water could over spill.

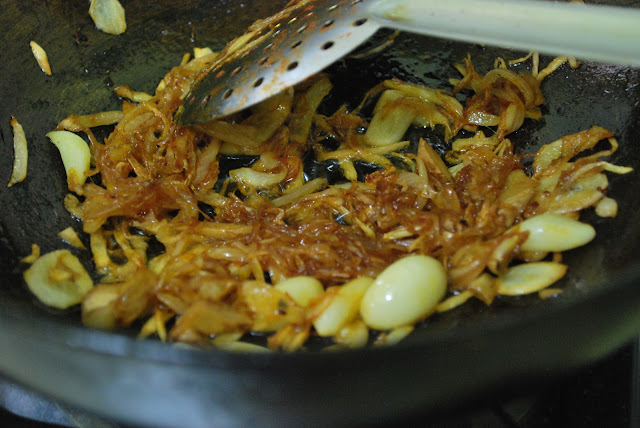
2. Heat 2 tbsp of oil. Add the onions. Fry till golden brown. Add the ginger and garlic. Fry for a minute and set aside to cool.
3. Heat 1 tbsp of oil. Add the tomatoes and red chilli powder. Fry till fat separates and set aside to cool.
4. Once cooled, add the tomato mix, onion mix and the khus khus and cashew along with the water in which they are soaking into the food processor and blend till smooth.
5. Heat a little oil and lightly fry the panneer pieces till they get a golden tinge on all sides. This step can be skipped if you are sure about the panneer. I had tried heritage panneer for the first time and hence did not want to risk it.
6.Heat 1 tbsp oil. Add the cloves and cinnamon. Put in the kasuri methi. Fry for a minute. Put in the blended mixture. Add salt. Let it bubble away (cover with lid, else your kitchen will be an absolute mess). Make sure to stir as the cashew paste will make it stick. After about 5 minutes, add some milk till you get the desired consistency. Once the fat separates, add the panneer pieces. Turn off heat after 5 minutes. Add a dollop of butter before serving.
Note : In step 4, mom's recipes requires the cashew and khus khus to be ground separately. Since I have a huge mixie jar, in which that small quantity wont get ground to a smooth paste, I add it along with the other stuff to be ground. In case you do grind it separately, add it in step 6 before adding the milk and fry for 3 minutes.
Here's a pic with naans which I made recently.

This tastes best with rotis. We had it with methi roti which tasted good too.
Methi roti recipe :
1 small bunch of methi
3 green chillies
1 tsp of cumin powder
A pinch of turmeric powder
1 handful of besan/gram flour
3 handfuls of atta/wheat flour
1 tbsp oil
Water
Grind the green chillies and cleaned methi to a paste. Add all other ingredients and make a soft dough. Roll out like chapati and roast on a hot tawa with oil/ghee/butter.
Ingredients (serves 2) :
- 200 grams of panneer - cut into cubes
- 1 large onion - roughly chopped
- 1 inch stick of cinnamon
- 3 cloves
- 3 medium tomatoes - chopped {the key is to have the same quantity of tomato as there is onion, so adjust accordingly}
- 15 pieces whole cashew
- 1 tbsp khus khus - add 1 more tbsp of cashew if you do not have khus khus. Khus Khus is also known as poppy seeds. Images of khus khus
- 1 tsp red chilli powder
- a pinch of kasuri methi
- salt to taste
- water
- 3.5 tbsp of oil
- ginger - 1 inch piece chopped
- garlic - 6 cloves
- Milk for getting desired consistency


How I made it :
1. Soak the khus khus and cashew in a small quantity of water, enough to at least cover the khus khus and cashew. Heat up the water - a minute in the microwave. Watch the time as the water could over spill.

2. Heat 2 tbsp of oil. Add the onions. Fry till golden brown. Add the ginger and garlic. Fry for a minute and set aside to cool.

3. Heat 1 tbsp of oil. Add the tomatoes and red chilli powder. Fry till fat separates and set aside to cool.
4. Once cooled, add the tomato mix, onion mix and the khus khus and cashew along with the water in which they are soaking into the food processor and blend till smooth.

5. Heat a little oil and lightly fry the panneer pieces till they get a golden tinge on all sides. This step can be skipped if you are sure about the panneer. I had tried heritage panneer for the first time and hence did not want to risk it.
6.Heat 1 tbsp oil. Add the cloves and cinnamon. Put in the kasuri methi. Fry for a minute. Put in the blended mixture. Add salt. Let it bubble away (cover with lid, else your kitchen will be an absolute mess). Make sure to stir as the cashew paste will make it stick. After about 5 minutes, add some milk till you get the desired consistency. Once the fat separates, add the panneer pieces. Turn off heat after 5 minutes. Add a dollop of butter before serving.
Note : In step 4, mom's recipes requires the cashew and khus khus to be ground separately. Since I have a huge mixie jar, in which that small quantity wont get ground to a smooth paste, I add it along with the other stuff to be ground. In case you do grind it separately, add it in step 6 before adding the milk and fry for 3 minutes.
Here's a pic with naans which I made recently.

This tastes best with rotis. We had it with methi roti which tasted good too.
Methi roti recipe :
1 small bunch of methi
3 green chillies
1 tsp of cumin powder
A pinch of turmeric powder
1 handful of besan/gram flour
3 handfuls of atta/wheat flour
1 tbsp oil
Water
Grind the green chillies and cleaned methi to a paste. Add all other ingredients and make a soft dough. Roll out like chapati and roast on a hot tawa with oil/ghee/butter.
Mixed vegetable kurma
I've decided that at least for now, most of the posts on the blog will be recipes of those dishes that I have grown up eating. I would love to be known as a good cook just as my mom, aunt and cook Sushila. And what better way than to master their own recipes. I've mastered mom's naans and butter panneer. Now, here's the recipe of mixed vegetable kurma made by Sushila. It goes well with parathas, naans and steamed rice. At home we usually have it with rice.
Ingredients (serves 4) :

Ingredients (serves 4) :
- 1 medium sized potato - cut into small cubes
- 2 medium carrots - cut into shapes similar in size to the potato
- 15 french beans - cut into 1 inch pieces
- 1 small sized red onion - chopped
- 5 small sambar onion - chopped
- 1 tbsp oil
- 1/2 tsp garam masala
- 1 large tomato, preferable country variety - chopped
- 1 tsp mustard seeds
- 1 big slit green chilly
- 1/4 tsp methi fenugreek seeds
- A pinch of kasuri methi
- Salt to taste
- To grind :
- 1/4 cup coconut
- 6 whole red chillies
- 1 tsp coriander powder
- 6 cloves garlic
- 1 inch piece ginger
- 5 small sambar onions
- 1/2 tsp khus khus

How I made it :
- Heat oil in a pressure cooker.
- Add methi and mustard seeds.
- Add slit green chilly.
- Add kasuri methi.
- After a minute, add the onions - both small sambar onion and small red onion.
- Fry till the onions start to brown.
- Add the paste.
- Fry on low for about 8 minutes.
- Now add the chopped tomatoes.
- Fry on low for another 5 minutes.
- Add garam masala. Adjust salt.
- Put in the vegetables.
- Pour enough water to just cover the entire mixture. Close cooker.
- Give one whistle on high and one on low.
- Garnish with chopped coriander and serve.
We had it with naans
Homemade Butter Naan
Mom's butter panneer and naan go very well together. Mom had made this combo recently when I was in Ooty with friends and it was a hit as always. On popular demand, here is the recipe for the naan. You can find the recipe for butter panneer here.
Ingredients (makes 5 naans) :
Ingredients (makes 5 naans) :
- 1 cup maida
- 1 tsp sugar
- 1 tsp salt
- 1 tbsp oil
- 2 tbsp curd
- Whey from what is left of home made panneer
How to make it :
- Mix the maida, sugar, salt, oil and curd.
- Add the whey little by little to make a smooth pliable dough.
- Cover with a wet cloth and keep aside for at least 1 hour.
- After an hour, roll out into thick rotis. It should be about 1/4 inch thick.
- Heat your tava real to steaming temperature.
- Wet your palm and spread evenly across one surface of the roti.
- Place this wet side on the tava. Reduce heat.
- Allow it to cook for a minute.
- Now turn the tava so that the other surface of the roti now is directly on the flame. If the roti falls off, use your traditional roti holder to hold and turn the naan.
- Spread butter on the top and butter naan is ready to serve.
Aloo Gobi Sabji
Whilst in school, I did not have to carry lunch. We were provided nutritious meals at school. When I moved to college, I had to carry my own dabba. My aunt would wake up at 5 every morning and prepare yummy dishes for the dabba. One of my favorites was this aloo gobhi sabji. My aunt would pack 2 dabbas when she made this, as my classmates would not spare me a morsel. Trust me, it was truly delicious. I had seen her making it a few times but not in entirety. Here's what I remember and how I make it.

Ingredients (serves 2) :
Ingredients (serves 2) :
- 1 medium sized cauliflower - with about 20 florets - don't split them yet.
- 12 baby potatoes with skin on - you can use 2 medium potatoes
- 2 large onions chopped finely
- 1 inch piece ginger
- 6 cloves of garlic
- 1 green chilli
- 1/4 capsicum chopped - optional
- 2 large tomatoes finely chopped
- 1/2+1/4 tsp turmeric powder
- 3/4 tsp red chilli powder
- 3/4 tsp coriander powder
- 3/4 tsp cumin/jeera powder
- 1/2 tsp garam masala powder
- 1/4 tsp amchoor powder
- 1 tbsp + 1 cup of oil
- 1tsp cumin seeds
- Salt to taste
- Coriander leaves to garnish
How I made it :
- Wash and boil the potatoes in salted water. Ensure that they don't get over boiled. They need to retain their shape. One whistle on high and one on low should do.
- In an open pot of hot boiling water, immerse the whole cauliflower upside down. Add 1/2 tsp turmeric powder. Turn off after 3 minutes and drain. Split the florets.
- In a wok, heat 1 cup of oil. When hot, put in the potatoes. Cover and let them fry. If you have put them in with the skin, you will know when they are done based on the crumples on the skin.
- Remove the potatoes and drain on a kitchen towel.
- In the same oil, put the cauliflower and fry them till the edges of the florets brown. Remove and drain on kitchen towel or piece of newspaper.
- In another pan, heat 1 tbsp oil.
- Put in the cumin seeds.
- After 30 seconds, put in the onions.
- Mince the ginger and garlic. When the onion start to turn light golden brown, put in the ginger garlic paste.
- Keep frying till the onions continue to brown. You could put in some more oil from the frying if you want to.
- Put in the green chillies and capsicum.
- Fry for 2 minutes. Add the tomatoes.
- Fry for 3 minutes and add all the dry powders.
- Fry till fat separates.
- Add salt and put in the potatoes and cauliflower.
- Cover and cook for 3-5 minutes.
- Garnish with chopped coriander leaves and serve with rotis.
Tip :
I usually use the oil in which I've fried stuff once, to make my chapatti/roti dough. Or, I top my rotis with this oil. Sometimes, I also use it in the curries as the oil need not be heated up to smoking point for curries.
Wednesday, September 19, 2012
Brussels Sprouts Curry

I love brussels sprouts. Not only do they look cute but they taste lovely in this awesome curry. I picked some up during my trip to Ooty, fresh from one of the freshest markets in the world that I know.

Ingredients (serves 3):
- 125g brussels sprouts - about 15
- potato - 15 cubes of similar size as the brussels sprouts - this will ensure even cooking
- 2 tbsp masoor dal - washe and kept aside to soak
- 1/4 cup fresh coconut
- 1 tsp coriander powder
- 4 whole red chillies - adjust as per spiciness desired
- 4 cloves of garlic
- 1 inch of ginger
- 5+5 small onions
- 1 small sized red onion - chopped
- 1 medium to large sized tomato chopped
- 1/2 tsp red chilli powder - may not be needed as per spiciness desired
- 1/2 tsp turmeric powder
- 1/2 tsp mustard seeds
- 1 spring curry leaves
- 1 tbsp oil
- 1 cup water
- Salt to taste
- coriander leaves for garnish
How I made it :
- Grind together the coconut, garlic, ginger, whole red chilly, coriander powder and 5 small onions. Add a little water to bring it all together.
- Remove the outer dirty layers of the brussels sprouts. Halve them. Place in salted water until ready to cook. This will help get any worms out.
- In a pressure cooker, heat oil.
- Put in mustard seeds. Let them splutter.
- Add the curry leaves followed by chopped onion and the remaining 5 whole small onions.
- When the onion turns pink, add the ground paste from 1.
- Fry till fat separates or the mixture moves as one mass without sticking to bottom of cooker.
- Add chopped tomates. Fry on low for 5 minutes.
- Add potatoes. Add 1/4 cup water and allow to cook for another 5 minutes on low.
- Now, add the masoor dal and remaining water. Add turmeric powder. Boil away for 5 minutes.
- Adjust salt. Add the brussels sprouts. Add red chilli powder if required.
- Cover and give one whistle on high and one on low.
- Garnish with chopped coriander leaves and serve with rice.
Tuesday, September 11, 2012
Chocolate Almond Tart
I was trying to make a cake and while the cake was baking, I made the frosting. Unfortunately, the cake did not cook and so I had the frosting stored away in a box. I had to do something with it. I then tried to make cookies and that sparked this idea.

For tart filling :

This reminded me of the chocolate rum balls that we used to get at Sugar Daddy in Ooty.

For tart filling :
- 2 ounces cooking chocolate
- 2 tablespoon rum
- 5 to 6 tablespoon unsalted butter
For the tart (adapted from here):
- 2 tablespoon unsalted butter
- 1/8 cup sugar
- 3/4 tablespoon brown sugar
- 1/8 teaspoon salt
- 1/8 tsp baking powder
- 1/8 tsp vanilla extract
- 1/8 tsp instant coffee powder
- 1/8 cup maid
- 1/4 cup cocoa powder
- 1 egg yolk
Topping :
- Chopped toasted almonds
- Whole almonds - about 20

How to make it :
Tart filling :
- On 50% micro power, melt the chocolate minute by minute, mixing in between. Don't do it on high and ensure that the bowl is completely void of any water droplet or else the chocolate could seize.
- Add in the butter and rum. Mix to form smooth mixture.
Tart :
- Preheat oven at 200 degree C.
- Mix together the butter, sugar, brown sugar, salt, baking powder, instant coffee powder and vanilla extract until well combined.
- Mix in the egg yolk and beat well.
- Add the flour and cocoa all at once. Mix well. A beater will be very helpful here to get the mixture evenly distributed.
- Combine to form a smooth dough.
- Roll out the dough to a round shape bigger than the size of the tart pan.
- Carefully place this over the tart pan. Push into the corners. Cut out extras. Using the rolling pin is helpful in getting the rolled out dough into the tart pan. Roll the dough over the rolling pin and then unroll over the tart pan.
- Since there is not much baking powder, we can bake without the weight on the top.
- Bake in the oven for 15 minutes.
- Once out and cooled. Pour in tart filling.
- Garnish with almonds. Serve chilled.
Homemade bounty bars
Inspired by my friends, here is the recipe for home made bounty bars. Hubby being a mallu loves Bounty due to the coconut filling inside. I too love bounty and thus, this sure was a super hit.
Ingredients (Makes 18 bite sized bounty squares):
How I made it :

Ingredients (Makes 18 bite sized bounty squares):
- 1 cup + 1/4 cup grated fresh coconut
- 1/3 cup milkmaid
- 1/4 cup icing sugar
- 1/4 tsp vanilla essence/powder
- 1tbsp honey
- 5oz cooking chocolate
How I made it :
- Grate and keep coconut aside.
- In microwave safe bowl, mix the milkmaid, icing sugar, vanilla essence and honey.
- Heat in microwave on 50% power for 1 minute. Mix well.
- Repeat step 3, until you see the mixture turning colour, basically caramelizing. This is called Maillard reaction. This was the first time I was trying this in my microwave and so I was extra careful and this kind of affected the taste of the bounty filling. Basically this mixture should turn golden brown and be sticky like caramel.
- Once you get that, mix in the coconut. Keep in the fridge for 10 minutes.
- Shape into squares. Keep in fridge to firm up over night.
- Melt chocolate in double boiler. I usually use the microwave. Put into a micro safe bowl and heat at 50% power for 1 minute. Mix. Repeat if needed until chocolate has melted. This can not be done at 100% power cause the chocolate can seize if overheated. Also, ensure that the bowl is free of any water else that too could cause your chocolate to seize.
- Get the coconut bars out of the frige. Drop into melted chocolate. Use a fork to turn them around and fish them out and lay out baking paper to firm up and the chocolate layer to set.
- Bounty bars are ready to pop in.

Eggless Chocolate Banana cup cakes with Pomegranate
I got home today, thinking about the enthusiasm of my friends who travel with me to work. They have immense energy and always manage to try something new after work. And I went, why could I not show more zeal. They were planning to make cup cakes and I said, why should I not do so too. So, I quickly found this recipe to use up the pomegranates that we'd bought during our grocery shopping and decided that it was what I was going to make. I made an eggless version using banana puree instead of the egg and I quartered all the ingredients as I did not want to make 24!!! I also had half a coconut with which I thought I would make bounty bars - this again inspired by the same friends. Posting that recipe soon.

Ingredients (for 6 cupcakes) :


Ingredients (for 6 cupcakes) :
- 1/4 + 1/8 cup flour
- 1/4 cup cocoa powder
- 1/8 tsp vanilla powder or essence
- 1/8 tsp baking soda
- 1/4 + 1/8 tsp baking powder
- 1/8 tsp salt
- 1/4 cup sugar
- 1/4 cup milk
- 1/8 cup oil
- 1 medium banana - ripe
- 1/4 cup pomegranate seeds
- 1/8 cup boiling hot water
How I made it :
- Preheat oven to 190 degree C.
- Blend the banana, milk and oil in a mixie jar and keep aside.
- Sift the flour, baking powder, baking soda and cocoa powder.
- Add the salt and vanilla essence to the flour.
- Add the sugar followed by the blended mixture of step 1.
- Add boiling water. Mix well into smooth mixture.
- Throw in the pomegranate seeds.
- Line muffin tins with liners.
- Pour in mixture upto 3/4th level
- Bake at 190 degree C for 25 minutes.
These were amazing. The flavour of chocolate and banana with the bite of pomegranate here and there. Loved them and they were gone in hours.

Wednesday, August 22, 2012
Bhindi In Tomato Gravy
One of the first dishes that my sister in law made post marriage is this really simple ladies finger in a tomato based gravy and it was an instant hit amongst the entire family. It is such a hit that it has been added to the Gujrati thali sold at C-Store Cafe. I did sample it when I visited home this time and when I saw fresh bhindi at the grocery store, I just had to try the recipe out myself. It was over in a matter of minutes.
This picture is a capture of what was made to be served as part of the thali. The poor customers had to make do with just one helping. They loved it and came back for more but there was none left.

Ingredients (serves 1):
This picture is a capture of what was made to be served as part of the thali. The poor customers had to make do with just one helping. They loved it and came back for more but there was none left.

Ingredients (serves 1):
- 15 bhindi/okra cut into 1 inch pieces
- 4 cloves of garlic
- 1/2 inch piece of ginger
- 3 tomatoes - medium sized, preferably the country variety
- 1/2 tsp cumin powder
- 1/2 tsp coriander powder
- 1/2 tsp red chilli powder
- 1/2 tsp garam masala powder
- 1/4 tsp turmeric powder
- Salt to taste
- 1 tbsp oil
How I made it :
- Puree the tomatoes, ginger and garlic.
- Zap the chopped okra in the microwave on high for 4 minutes
- Heat oil in a pan.
- Add the puree made in 1.
- Fry till the fat separates.
- Add the cumin, red chilli, coriander, turmeric and garam masala powders.
- Add salt and throw in the okra/bhindi. Mix well. Garnish with Coriander and serve with rotis.
Thursday, August 16, 2012
Eggless Whole Wheat Banana Almond Pancakes
Since we have plans to travel this weekend and I was unwell last weekend, I have not stocked up my fridge and pantry. A few days back Pras and I had a fight over breakfast, I just did not have anything on hand to make a substantial meal. It is so true "A hungry man is an angry man". To avoid a repeat of the same, I quickly thought of making pancakes without eggs as I did not have any. I did have a couple of ripe bananas. So I decided to make Banana Pancakes.
Last Monday I had tried to make a Chocolate Almond Cake by Julia Child but it was a disaster. I guess I should've baked it longer. Anyways, I had the almonds that I had toasted for the decoration. I chopped them into slivers to sprinkle atop the pancakes.

Ingredients (makes 4 pancakes):
Last Monday I had tried to make a Chocolate Almond Cake by Julia Child but it was a disaster. I guess I should've baked it longer. Anyways, I had the almonds that I had toasted for the decoration. I chopped them into slivers to sprinkle atop the pancakes.

Ingredients (makes 4 pancakes):
- 1/2 cup whole wheat flour
- A pinch of salt
- 1/2 tsp baking powder
- 3/4 cup milk
- 1 tbsp sugar
- 2 medium ripe bananas - sliced into rounds
- 8 toasted almonds chopped into slivers
- 2 tsp Butter
How I made it:
- Mix the whole wheat flour, salt, baking powder and sugar.
- Add in the milk and mix into a smooth batter - with no lumps.
- Heat a skillet.
- Add 1/2 tsp butter. Pour a ladleful of batter.
- Sprinkle some chopped bananas and almond slivers.
- Cover and cook for 45 seconds.
- Flip over and cook for another 30 seconds.
These tasted delicious especially cause of the sweetness of the bananas. They did not require any honey on them as they were sweet by themselves. I'd reckon that they tasted like banana muffins without the wait :)
Circular Whole Wheat Pop Tarts - II
My family back in Ooty views my blog and photos and they go crazy as they are no longer able to sample the stuff that I make. When I asked my brother what he wanted when I visited and he went, "You make something and bring it over". I thought of the whole wheat pop tarts as I had bought this really nice Strawberry Mint Preserve from Kitchens of India. It has no preservative and the natural taste of the fruit comes through. Also, it is not overly sweet unlike other jams.
I made these circular in shape - smaller than the last batch so that the quantity would be substantial. I spent most of Independence day making them but loved popping them into my mouth. They just melt in the mouth. I made thrice the quantity mentioned in the recipe. Tip : You won't need as much iced water when you double/triple the quantity.
The recipe is here.
Here is a pic of the tarts just out of the oven.

Peek-a-boo from their lovely jar.

All set....

Sunday, August 5, 2012
Heart warming Chicken Sandwich with Sweet Corn Soup
While going to pick up the car from the service station, we saw two men selling ears of corn from the backside of a truck. He kept shouting "4 for 20 rupees". I told him I wanted just two and got some home. I wanted to make my sweet corn soup once more. This time I also got celery from the local store. Chopped pieces of celery leaves as well stalk when added to the soup make me go back in time to when I used to have this soup at home. This soup used to be made quite often at home. It is filling as well as good in the cold of Ooty. When tasting the soup with the celery added, I remembered that we used to have this with chicken sandwiches. It brought back one particular memory from the past.
Power cuts were quite common in Ooty when it rained. A tree would fall somewhere and there would not be power for days at end. On one such night, we were singing songs, a favorite time pass on a powerless evening, and munching these yummy chicken sandwiches along with the soup. My granny was around too and she would each time try to pry away the bollywood numbers from our minds and try to sing some songs in praise of god. Some of my most cherished memories and delectable combos.

Ingredients for 2 sandwiches :
- 4 slices of brown bread
- Butter
- 1 leg of chicken
- Salt to taste
- 1/4 tsp vinegar
- Pepper to taste
How I made it :
- Boil the chicken with salt, vinegar in water. I pressure cooked it for 2 whistles on high and 1 whistle on low. The vinegar makes the chicken stay white and cook faster. Retain water/stock for use in soups, curries for enhanced flavour.
- Shred the chicken into small pieces.
- Heat the tava. Place the slices of bread on the warm tava. The idea is to warm the slices through.
- Generously butter all slices of bread on 1 side each.
- Mix pepper into the chicken.
- Take two slices of bread. Place them down with buttered side facing up. Spread chicken on the bread. Cover each with the other slice of bread with buttered side down.
- Serve hot with any soup of your choice.
We had this with sweet corn soup and it was a whole lot things for me. A hearty meal indeed.
Tuesday, July 31, 2012
Baking Partners
Baking
Partners: A new Baking Group
A
group of home bakers helping each other to achieve perfection.
Baking a home made Baking a homemade bread, cake or cookies will give
the best outcome. However in order to achieve the best results, a perfect
recipe and right techniques are required.
We are a small group of home baker friends, who love and want
to learn more about the nook and corners of baking. We are planning to try out recipes from
books/magazines and cooking shows. Every
member gets a chance to present their choice of recipe and share important
points with the rest of the group.
Main purpose of this group is to learn the techniques, critic the
procedure if there are ways to improve, and to eat a delicious food.
Rules are simple, we will choose one recipe and send it out to the
group by 16th of every month and the reveal date will be 15th of the next
month. On that day we will blog about it. A linky tool will be open during that
time and each member can link their post.
First month we are going to do a recipe, 2nd and 3rd month will be a
theme and the 4th month we will be back at a recipe. By doing in between
recipes, we will able to learn more.
All enthusiastic bloggers interested in baking are welcome,
please email Swathi at favoriterecipes12@gmail.com.
We will appreciate the use of logo or worded link that will help to
spread the word. A bunch of thanks to
Tina for designing this beautiful logo
If you want to make it a gluten
or vegan free diet, you can do those modifications also.
Baking a homemade bread, cake or cookies will give the best outcome.
However in order to achieve the best results, a perfect recipe and right
techniques are required.
We are a small group of home baker friends, who love and want
to learn more about the nook and corners of baking. We are planning to try out recipes from
books/magazines and cooking shows. Every
member gets a chance to present their choice of recipe and share important
points with the rest of the group.
Main purpose of this group is to learn the techniques, critic the
procedure if there are ways to improve, and to eat a delicious food.
Rules are simple, we will choose one recipe and send it out to the
group by 16th of every month and the reveal date will be 15th of the next
month. On that day we will blog about it. A linky tool will be open during that
time and each member can link their post.
First month we are going to do a recipe, 2nd and 3rd month will be a
theme and the 4th month we will be back at a recipe. By doing in between
recipes, we will able to learn more.
All enthusiastic bloggers interested in baking are welcome,
please email me at favoriterecipes12@gmail.com.
We will appreciate the use of logo or worded link that will help to
spread the word. A bunch of thanks to
Tina for designing this beautiful logo
If you want to make it a gluten
or vegan free diet, you can do those modifications also.
Baking Partners are
1. Reeni (Cinnamonspiceandeverythingnice)
16. Jayasiri ( Samayalarai
)
And

Subscribe to:
Posts (Atom)